If you feel creative and you want to style up your canvas tote bags, trying your hand with some painting is not a bad idea at all. You know we are all for using our imagination and our talents to turn our canvas tote bags into veritable pieces of art.
Not so long ago we have talked about how to accessorize your canvas zipper bags. Adding decorations to a tote bag is one fun way to put those arts and crafts skills of yours to work, but today we will take things a step further: we will teach you how to paint on canvas tote bags. It will be a blast, so let’s not waste any more time, shall we?
Materials
The first thing you need to start your art project on your favorite canvas bag is to gather up the materials. Since this will probably not be your first and only project, our advice is to invest in inexpensive, but high-quality products and materials.
1. Pick Your Tote Bag
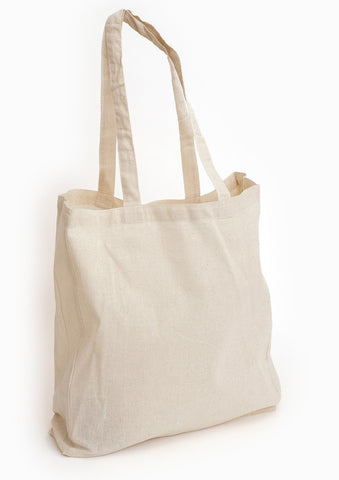
Get This Tote Bag for Under a Dollar
If you are a beginner when it comes to painting on canvas, it is best start with plain canvas tote bags to make sure you get the idea of color and contrast correctly. Surely, you can also paint on colored tote bags – as you will already have a background color to start from, but we recommend beginners to find their inner artist by starting out with simple white or natural canvas.
How to Start
Pick a canvas tote bag in a medium size and make sure you take it out of any plastic wrap. You have no idea how many people try to paint over the cellophane wrap.
- Next, make sure your canvas tote bag is not wrinkly and crumpled, as it will make the painting process a lot more difficult.
- Lightly iron the tote bag to obtain a smooth, stretched surface.
- Prepare your workspace with a board you can pin the four corners of the tote bag onto; the bag has to be stretched while you paint on it. Canvas paper is a great work medium to begin on, because it is inexpensive and has a texture similar to stretched canvas. Board and wood are good choices as well.
2. Pick Your Paint
When it comes to painting on canvas, you have a handful of options regarding paint.
- Acrylic paint – such paint dries up faster, allowing you to add many layers or apply crisp lines; acrylic paint is better for smaller canvas surfaces (such as tote bags), but color blending is harder. Acrylic paint also looks darker when it dries on canvas, so you should use color carefully. In addition, acrylic paint comes in a high viscosity and body, great for thick, Van Gogh-style paintings, or thin, liquid acrylic paint, to use for dreamy, watery landscapes and decorations.
- Oil paint – such paints take longer to dry, but allow you to blend them well and mix/transition the colors easier and better. Oil painting needs some canvas preparation, as the oils can degrade the fabrics over time. The good part is that oil paints keep their original colors when they dry.
- Watercolors – this type of paint is not extremely popular, because watercolors fade in time and dissipate if you wash the tote bag, but they allow you to create dreamy atmospheres and abstract paintings that do not need crisp, sharp lines.
If you are new to the whole canvas painting projects, go to a specialized arts and crafts store and talk to a professional. Ask about the best fabric paints and even show the tote bag you want to turn into your next work of art.
How to Start
As colors go, for a beginner, it is better to start out with basic choices of red, blue, yellow, black and white paint. Between these colors, you can mix any shade to create your art.
3. Pick Your Brushes
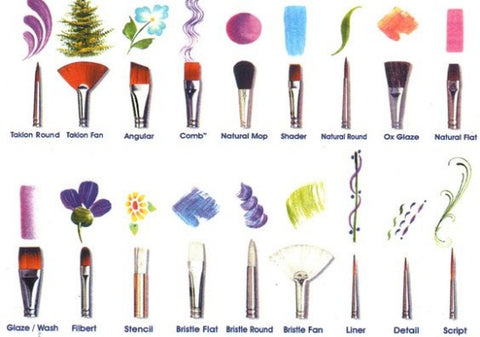
Each paint comes with specifications for brushes. If you go with acrylic, which we recommend for canvas tote bags, you should pick the proper brushes as well. They are a bit longer and sturdier than watercolor brushes because you will need to press them harder against the canvas fabric. We also recommend synthetic brushes, as they are more resilient to the chemicals in the acrylic paint.
- Natural brushes go better with oil paints and watercolors.
How to Start
If this is your first project and you are just gathering the materials, start with one large and one small round brush and with one large and one small flat brush. These four brushes will get you where you want to arrive with little to no effort.
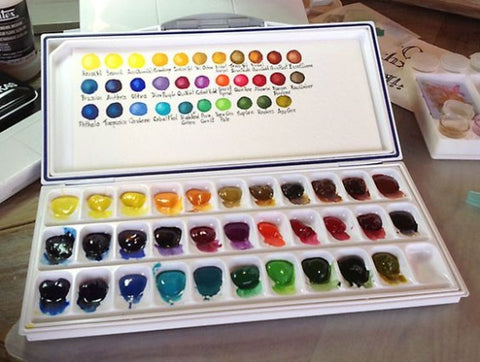
4. Pick the Palette and the Palette Knife
In terms of medium to mix your paints on, you can go with a professional palette or a porcelain palette. The palette knife is essential when you work with acrylic paint. It can help you mix and spread the paint and apply paint on the canvas itself, for a more artistic effect of your future art.
Of course, you can mix some of the colors with your brushes, but since acrylic paint is rougher and thicker, the vigorous mixing movements may alter the bristles. The knife, on the other hand, will help you mix faster all the colors you want.
5. Other Materials
In order for you to begin painting on your canvas bags, you will also need a cup of water.
- Make sure the base of the cup is larger or the same size as the top of the cup, as you do not want the cup to tip over and ruin your work. If you do not buy a special painting water cup and use a mug you have around the house, make sure you will use this mug only for future painting projects.
- If you buy fluid acrylic paint, keep in mind you will not need to dilute it a lot with water. Such paints come from the factory in a thin consistency and contain an acrylic binder, together with nice strong saturation of color. You can add a touch of water into such paint for even more fluidity, because the paint will hold the acrylic bond safely.
You will also need some scrap paper to wipe away excess paint from your brush or test out paint quality. A simple sheet of white printing paper will do.
Other materials also include:
- Thin gloves if you do not want to get your hands incredibly dirty from the painting (surgical ones work incredibly well);
- An apron if you do not want to make a mess out of your clothes;
- If you want a “painting by colors” type of project, you can also use a color chart to make sure you mix the correct paints to get the desired colors and nuances.
Work Environment Preparation
Now that you have all materials, you can begin preparing your work environment. Use a large table to set everything and have all products at the ready.
- Set up your palette: no matter what you want to paint, it is helpful and time-efficient to already have a dab of each of the primary paints (plus black and white) on the palette. Spread the dabs of paint far from each other so you can have enough space to use the colors individually or mix them the way you want.
How to Paint on Canvas Tote Bags: The Art
Now the time has come to get into the serious part of this tutorial: the art of painting your canvas tote bag! Let us begin!
1. Prepare Your Canvas
Keep in mind that a canvas tote bag is not the same thing as a sheet of canvas that painters use. This is why you need to prep your tote bag remembering it has at least two sides and handles.
- Stretch your tote bag so it does not fold, crease, or wrinkle as you work on it with brushes, water, and paint.
- You can clip the four corners of the tote bag onto the corners of a flat sheet of rectangular/square hard plastic or board. The handles can hang outside the working sheet of plastic in case you do not want to paint them as well.
- Moreover, if you want to paint only one side of the canvas tote bag, make sure you insert inside the bag a sheet of plastic or board so the water and colors do not transfer from one side of the tote to the other one. This piece of plastic or board should fit perfectly inside the bag, allow it to stretch a little, and have the same size as the bag and the other sheet of plastic underneath the bag.
The second step in the canvas preparation process is treating the fabric with a coat of gasset. This will dry quickly and will keep your painting archival.
- Before you treat the side of the canvas tote bag with gasset, ask the manufacturer if the surface and the fabric needs such a treating. Since we are not talking about professional painting canvas but a tote bag, it is better to ask the manufacturer such questions.
Usually, the handmade community recommends treating the tote bag with gasset just in case. Hand painted tote bags look amazing because the artists do not skip any detail.
2. Set the Mood of Your Painting
You can skip this step if you feel it is too complicated or “professional”, but it would be a pity. This “ground tone” is the first layer of paint you apply over the gesso. It will set the tone and mood of your entire artwork.
- If you want a moody, expressive painting, the white plain canvas may not suggest emotion to the intensity you desire. However, a light coat of gray can offer a moody surface so you can create your desired image. Similarly, a vibrant green ground tone is perfect for a summery landscape creation, while a faded dusty pink ground allows you to achieve dreamy abstracts or moon-and-stars type of art.
Let the ground tone dry and start from there with your painting!
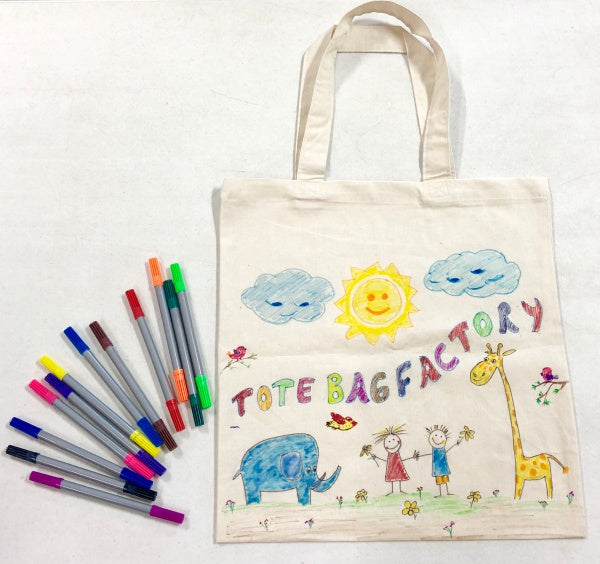
3. Painting by Numbers
If you are a beginner and you want a perfect painting on your tote bag, you should begin with a “paint by numbers” method. This means using a picture as a reference or a stencil to guide your hand.
- If you use an image, also use tracing paper to transfer the model onto the canvas tote bag’s side. Use a thin but sharp pencil, as you need only some fine lines you will fill in with color later on.
- If you want to paint by stencils – especially if you want to paint words and letters on your canvas tote bag – use paper cutouts. Place the cutouts over the canvas and fill in the “blanks” with the colors of your choice.
Keep in mind that painting with the use of paper trace shapes or paper cutouts will allow you to create images with sharp contours and lines. If you want to paint a delicious giant muffin on your bag, or geometric shapes, such a method will make things easier for you.
On the other hand, if you are into landscapes, starry night skies, or abstract painting, among others, you will need to experiment with freestyling, which means painting by hand in free form.
This is one of the fun parts in your canvas tote bag painting process. Besides the acrylic paints, you can also use glitter to enhance some lines or shapes. You can use a mix of paint and glitter to “write” down messages on your tote bag.
We spoke about embroidering your tote bags before, so a hand-painting project to create a monogram or a written message on your bag is a very fun way to spend a free day (or start an entrepreneurial project).
4. Freestyling
As we said, if you have some painting skills, this is the part you were waiting for. Now it is your time to experiment and paint on your customized canvas bag without aids like paper cutouts or trace paper pre-made designs. Remember, there is no right or wrong way to do this, just learn from mistakes and have a lot of fun while doing it!
Conclusion
Now that we learned together how to paint on canvas tote bags, please tell us if you ever hand painted an accessory or a clothing item before or if you feel eager to begin expressing yourself creatively on your collection of tote bags!

